How To Make An Adjustable Rabbits Nesting Box
This is the most exciting time in our rabbitry! If you have a pet rabbit or raise rabbits for meat, you will at one point need rabbit nest boxes. You will need a nesting box that will grow with your bunnies. If this is your first time raising rabbits or you are looking for the best rabbit nesting box for your rabbits, keep reading and learn how to build your own, the faithfulfamilyfarmer way! Don’t feel like reading? Jump to the build.

Why We Raise Rabbits
We personally chose rabbits because of how quick we can get meat. Rabbits are also great for homesteaders who don’t have much room but still want their own meat. While we do have 30 acres, we still liked how they didn’t take up much space on our land. They also have a great amount of meat in relation to the amount of food they require. It is easy to afford high quality food for them because they don’t require much!
Rabbits typically have babies year around but in south Louisiana we choose not to breed during summer time since it’s too hot here. We choose to breed our rabbits in the fall, winter, and spring. Once we start in the fall we will breed them every 1-2 months after they have their babies. The babies are then ready to be butchered by 8-12 weeks old. We harvest the meat and keep the organs as well as the bones. We use every part that we can, so nothing goes to waste. This makes for a delicious and gut healing, rabbit bone broth.

When To Add Your Rabbit Nesting Box?
The nesting box will need to be added right before your doe delivers. The ideal time is two days before kindling. If you add it too late the babies will be born on the wire. If you add it too soon, your pregnant doe will most likely use it as a hide out and a litter box or even as her little safe space. One trick you can use to see if your mother rabbit is ready for her nesting box is to put a handful of hay in her nest. If she eats it or doesn’t care much about it she is not ready. If you see her go after the hay and start to stuff it in her mouth she is ready. A pregnant rabbit will try to fit as much material in her mouth at one time when she is ready to build a nest. When you see this add the box and get excited for your new baby bunnies! I think this part is so cute! If you aren’t sure if your rabbit is pregnant click here.
When Do I Take Out My Rabbit Nesting Box?
Taking your nest box out depends on your bunnies. When they start to leave the nest and hang out outside the nest this is a good time. A good rule of thumb is between 2-4 weeks. Then you can add your hide boxes. More on that in another post. We can keep our nesting boxes in longer and they can double as a hide box because of our adjustable fronts. Just take the front out and the bedding and you are good to go! Watch how here!
When Should I Clean My Rabbit Nesting Box?
This is personal preference but I like to wait until the bunnies start to open their eyes. This is normally around 10-14 days old. You can do it sooner if you are worried about the bunnies getting nest box eye. This may be a good idea in the summer when the nest can get stuffy. Just keep a close eye on the cleanliness of the nest. When I clean, I take out old bedding, put it in plastic bins or a five gallon bucket and bring it to the compost. Then I add a new cut to size paper feed bag and then a generous amount of pine shavings. Add your baby rabbits back in. Nice, fluffy and cute!
Different Materials I Use For My Rabbit Nesting Box
Like I mentioned before, I first line mine with a cut feed bag. Then I put a generous amount of hay or straw. You can use pine shavings if you’d like. Mother rabbit will fix this how she wants to, they have so much personality when you get to know your rabbits and they get very very particular. They like it a certain way, so don’t be offended if they move around all your hard work. Right before and/or after she kindles she will pluck her own fur to cover her babies. For the most part she knows how much hair she needs to use to create a perfect place for her babies. Keep some clean hair from a previous nest and use that If she doesn’t pull enough.
Different Types of Rabbit Nesting Boxes?
There are two main types of nesting boxes, a wooden box and a metal box. They both have their advantages and disadvantages. Wood nesting boxes give our rabbits something to chew on during the day, keeping them calm and entertained. This is also a good reason to use pine untreated wood, not treated wood or plywood. You don’t want your healthy rabbits chewing on chemicals. Wood boxes also help in the winter months keeping the nest as warm as possible. Metal boxes can get too cold on the sides especially in cold climates, but this could actually help in the summer in warm climates. Metal boxes are easier to clean giving them a higher advantages, but if you manage your nesting boxes correctly a wood box will do just fine. What it all boils down to is price. Wood is way more affordable and my top pick for a rabbit nesting box.
In our box build we use a wire bottom and wood side for easy cleaning. We line the wire with old paper feed bags. You can also use cardboard boxes, but it is too thick in my opinion. This will keep the babies from laying on the wire and if the mom does use the box as a litter box it will dry up nice instead of staying wet with a wooden floor bottom. For some reason they hate it. The mamma rabbits pull it out right away. If this happens I watch and add it every night until they kindle. sometimes they will rip it up, so cut a few extra to keep on hand. They have kindled without the paper on the bottom, so don’t panic. I have added it after with no problem. If this does happen, simply push the bedding and babies to the front of the nest box. tuck one side of the paper in the back of the box. Grab the bedding and babies and transfer to the back on the paper. Fold the paper down in the front and fix the nest material. position the babies in the center.

Will The Mom Reject The Babies If I Handle Them?
This was a big concern for me when I had to handle my first litter. I was nervous, but so far they have never rejected a litter if I touch the babies. I hope this will be the case for you too. This is because I am with them every day a couple times a day. I feed them, talk to them, pet them, clean their mess, and give them water and treats. They know my scent and are comfortable with me. They will reject a baby if you let someone else hold them when they are too young. This has happened, so be careful who holds your bunnies.
Efficient and Adjustable Nesting Box

It’s important that your nest box is well thought out and planned to fit your rabbitry needs. The size of the rabbit nest box will totally depend on your needs. You will want to make sure it will fit into your rabbit cage or rabbit hutch before building. Also you will want to make sure your box is big enough for your adult rabbits and the front should be tall enough so the baby bunnies don’t get pulled out onto the wire. We have large rabbits so our boxes have a lot of room for them. We just had a liter of 10 and they all fit in their just fine with their mom. In just a few minutes, you will be ready to give your rabbitry a new and improved nest box and create an ideal place for your new liter.
Our Nesting boxes have an adjustable front that allows your box to adjust to your growing bunnies. When they are small you will need a tall front so they don’t get pulled out and freeze on the wire cage. This is our adjustable safety feature we have added to ensure less losses. When they open their eyes, they get curious. This leads to exploring the cage and escaping the nest. At this point it needs to be low so they can get back in.
How to Build an Adjustable Rabbit Nesting Box
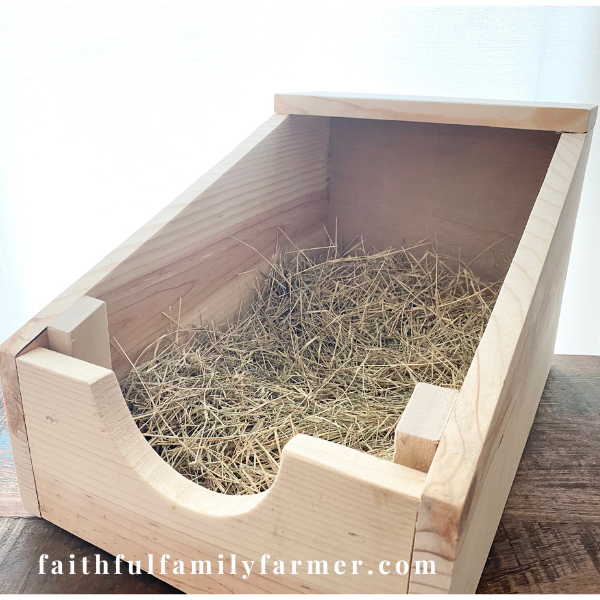
This is the most exciting time in our rabbitry! If you raise rabbits to sell as pets or raising for meat, you will at one point need a nesting box. This removable front rabbit nesting box is a total of 10" tall, 12" wide, and 18" long. the removable front allows your box to grow with your bunnies. When they are young the removable front should be inserted to stop babies from getting pulled out on the wire. When they start to explore the outside of the nest it can be removed for them to get back in.
Materials
- 1-1x12x8
- 1-1/4"x2'x4' ply wood
Tools
- Nail gun
- Nails
- Staple gun
- Staples
- Nail pullers for cutting and pulling
- Circular saw or jig saw
- Air compressor
- Air hose
- Drill ( if you don't have nail gun)
- Straight edge(level)
- Quick Square
- Pencil
- Tape measure
Instructions
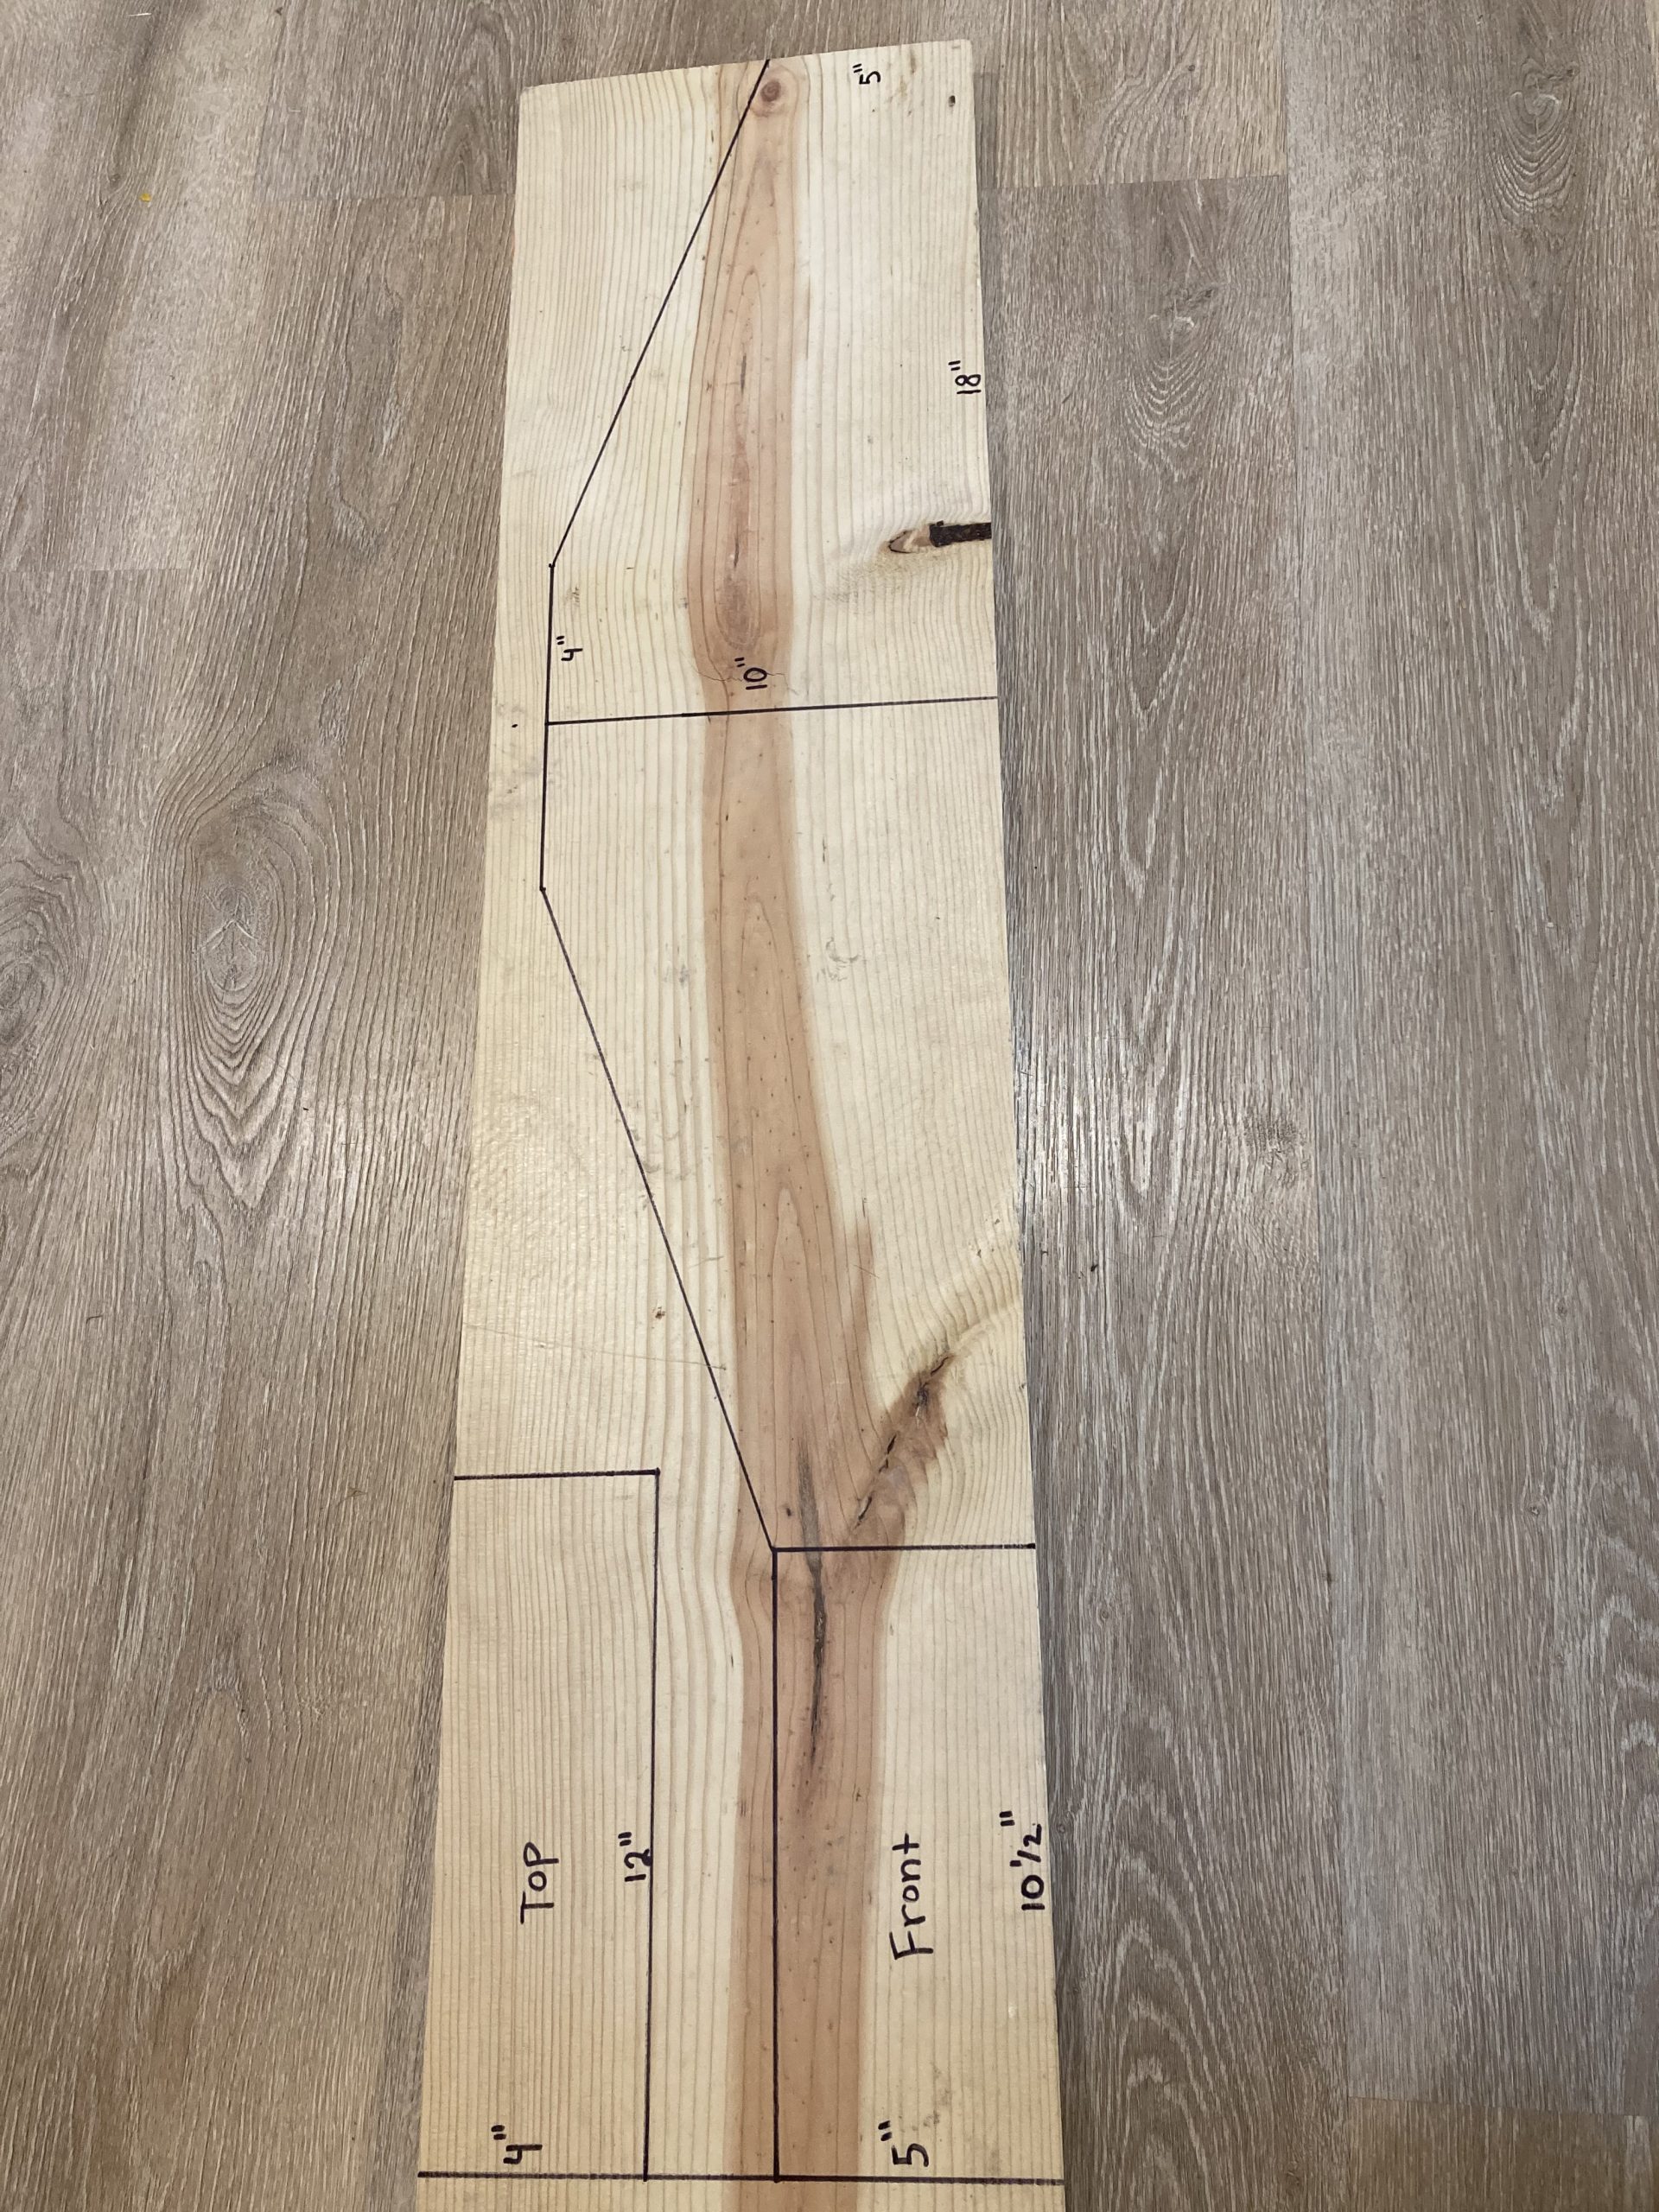
- Mark out the dimensions for the sides using straight edge and quick square. 10" high and 18" long.

- Mark out the dimensions for the front and the top. The top will need to be 4" tall and 12" long. The front should be 5" tall and 10.5" long.

- This is what your board should look like. This only uses four foot of the board.
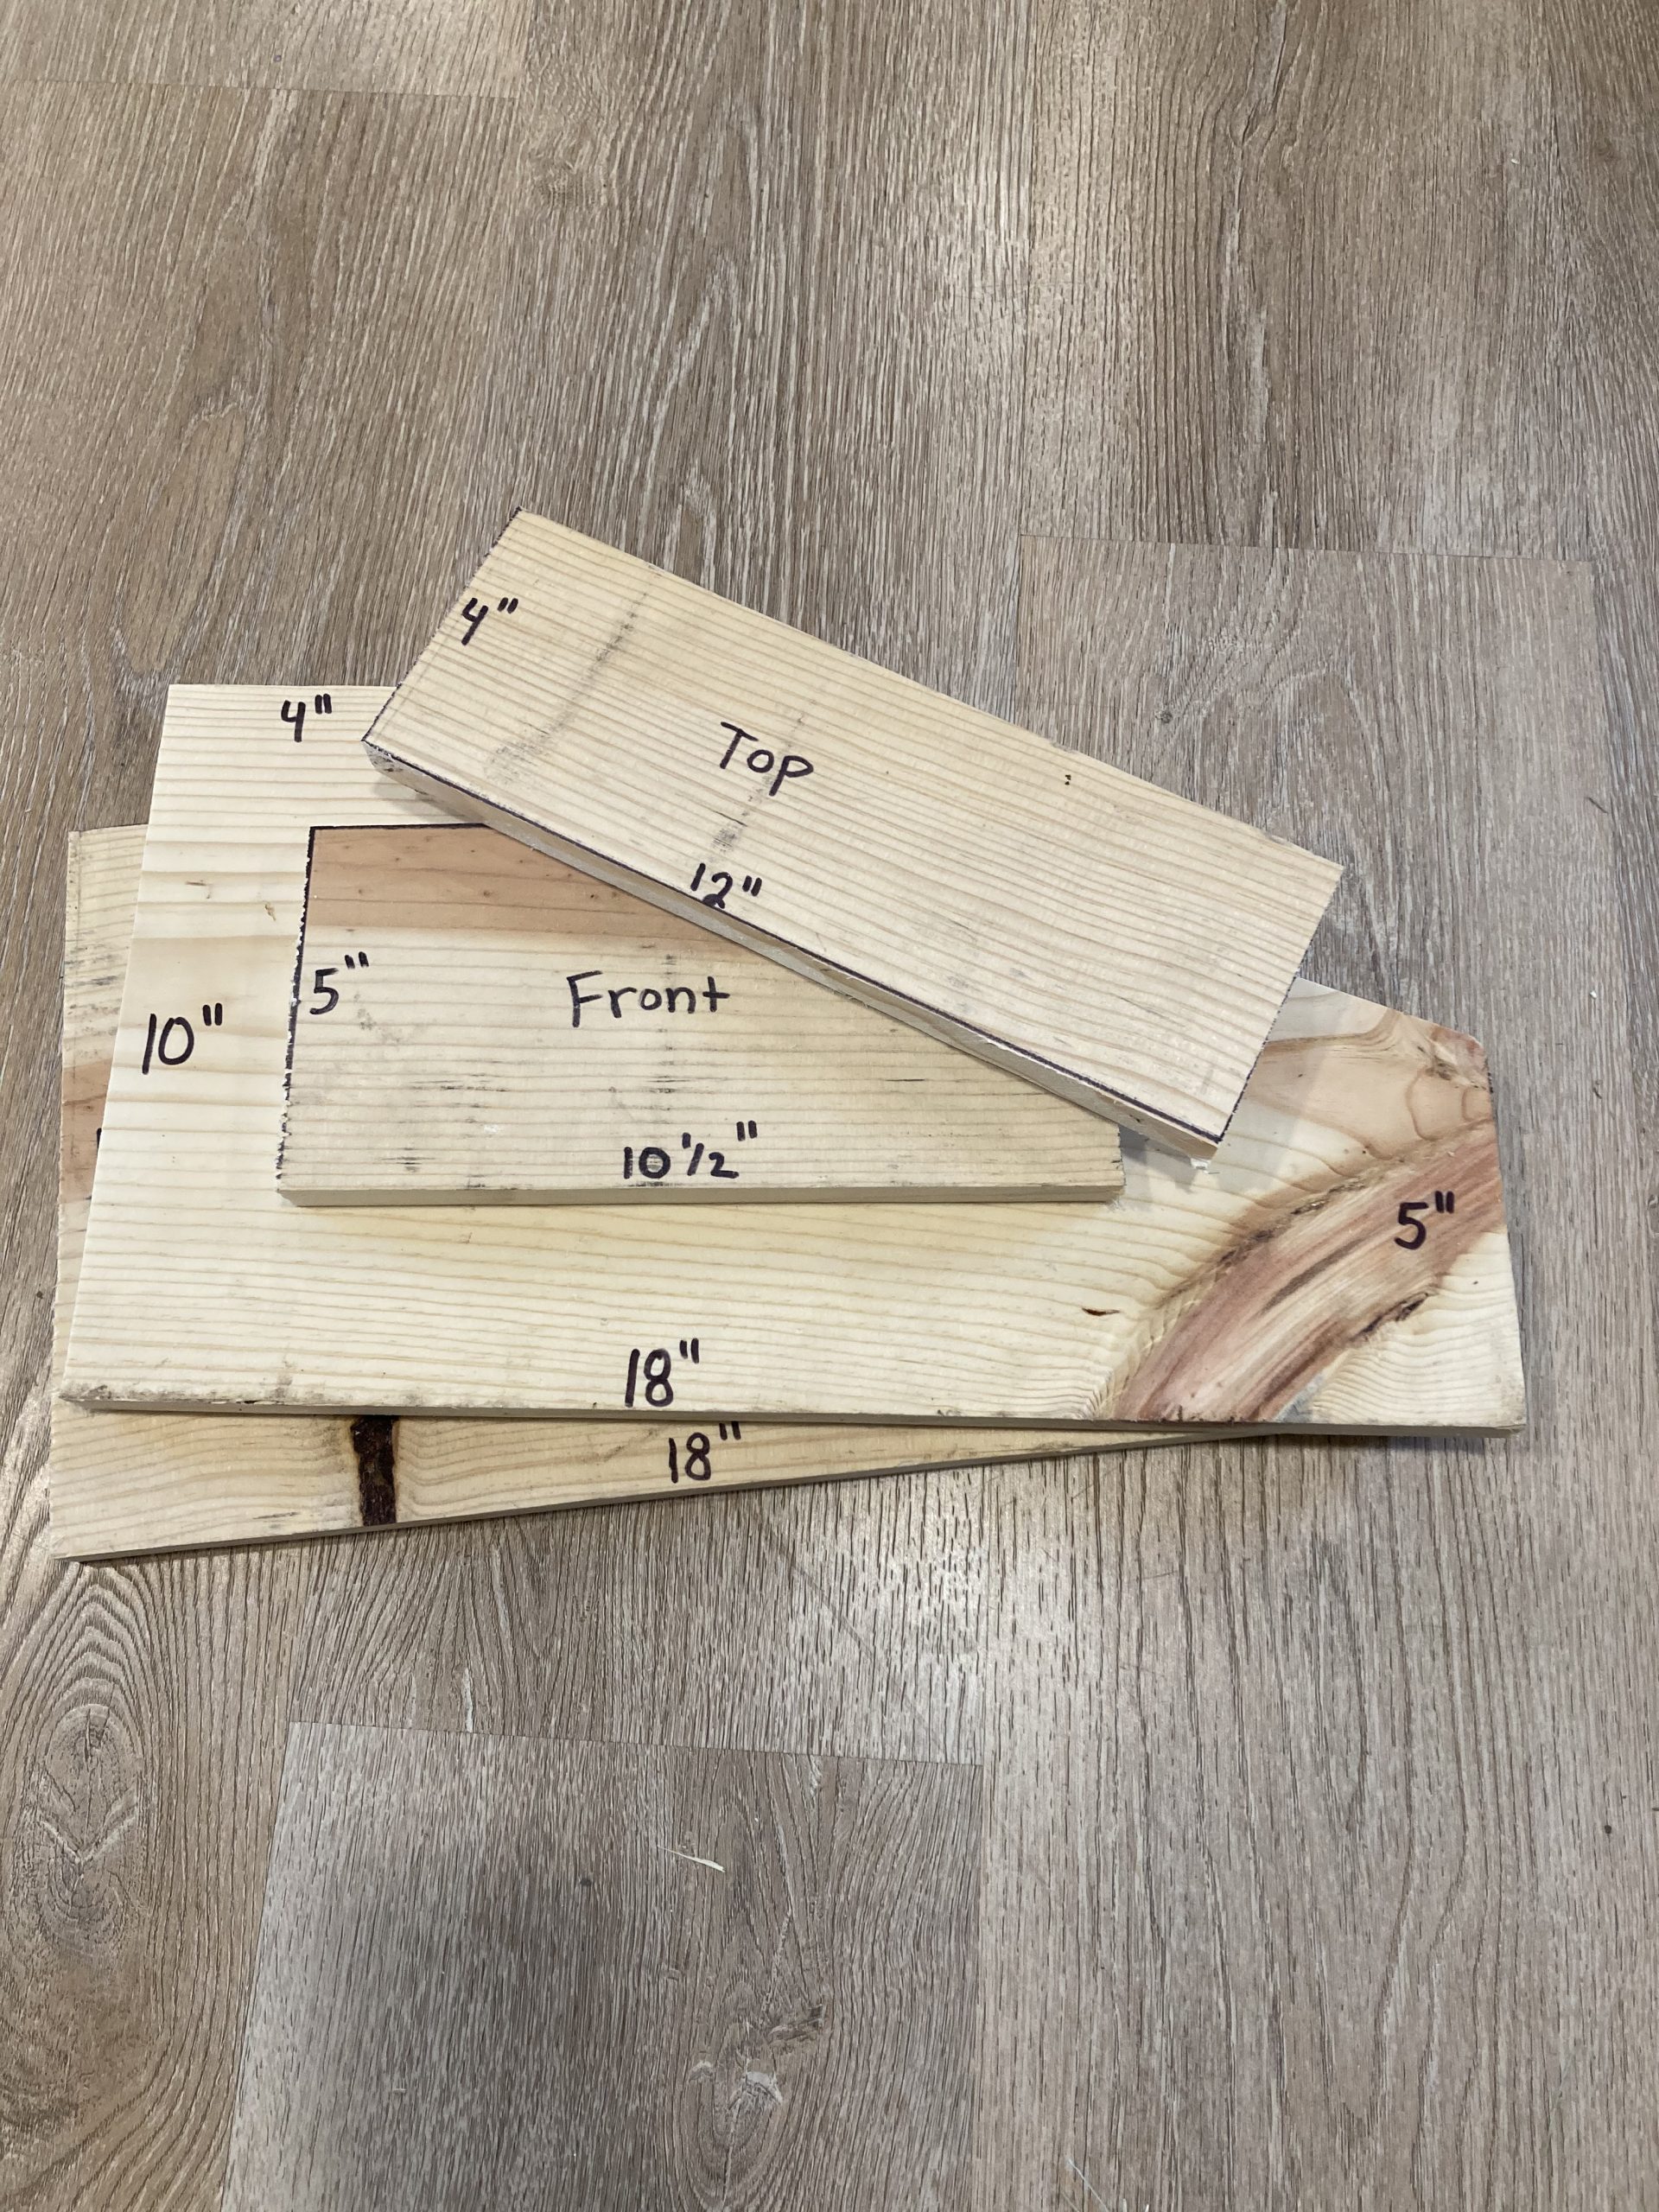
- Cut the parts with a circular saw or jig saw
- Assemble with nails or screws

- Now its time to cut the back of the box. Cut the 1/4" plywood 10" tall and 12" wide.
- Before we move on to our next step we need to cut a filler piece for the back so we have something to nail the cage floor bottom to. This needs to be cut to 10.5" long. This should be able to be cut from a cut off from your 3/4 inch lumber. The width can vary from 3/4" to 2". Attach to the back of the box on the bottom when cut.

- Once's assembled cut your cage floor bottom. 12" wide x 18" long.

- Attach using 5/8 staples or small u nails

- Mark half circle on front. you can use a paint can or lid of a container. Anything round will work.

- Cut with jig saw

- Cut removable front from your 1/4" plywood. This should be cut to the same dimensions as your front. You can shave a little off the length if it does not slide in easy.
- Mark your scrap 3/4" lumber for support pieces.

- Cut and nail the support piece. Not too tight or your removable front will not be able to slide correctly.

Notes
*If you are using screw make sure to pre dill the holes to prevent the wood from splitting.
*Cutting cage wire is way easier with a grinder but hand held snippers will work just fine.
*The sides, top, filler piece and front can all be cut out with 4ft of your 1x12x8
Are you ready for your new rabbits? I can never wait for our new bunnies and I bet you can’t either. It is such an exciting time for us on our homestead! I hope you enjoy this nest box build and it brings your rabbitry to the next level. Let me know in the comments how you prepare for your new kits! I would love to hear about your rabbit birthing success and ideas!